Showing posts with label Cooking. Show all posts

President's Day Outing And Homemade Barbecue Ribs!


President's Day may be an average holiday that many people don't get off, but I did. So, the plan was to take full advantage of a rare three day weekend, and maximize it.

My day actually started the night before when I prepped my barbecue ribs that would become dinner for the holiday. This began by preparing my rub.

INGREDIENTS

6 Tablespoons Brown Sugar
3/4 Teaspoon Black Pepper
1 1/2 Teaspoons Chili Powder
1 1/2 Teaspoons Salt
3 Teaspoons Onion Powder
3 Teaspoons Garlic Powder
3 Teaspoons Paprika
1 1/2 Teaspoon Oregano
1 Teaspoon Cayenne Pepper (Optional)

Throw all those spices into a bowl, and stir them up, ensuring you crush all the clumped bits of brown sugar. You want to get everything good and blended, and to ensure you do, you can even run it through a sifter, but that may be a bit overkill.

Once you have a nice mixture, take your ribs (or chicken, or really any kind of meat you want to turn into barbecue), and pat it dry.

You want to get as much moisture off the surface of your meat as possible. This will ensure your mixture actually adheres to the meat versus running off the liquid.

Generously coat the top side of your meat with the mixture, and then get down and dirty, rubbing it into the meat. Get every nook and cranny.

Flip your meat over, and repeat the process, making sure you get the sides as well.


With your meat coated, you're going to want to seal it, and let it rest in the fridge overnight. Alternatively, you could also freeze your meat if you want to eat it on a different day. Tinfoil will work if you want to let it sit over night. However, for me, I'm going to vacuum seal that bad boy.


If you don't own a vacuum sealer, I highly recommend one. This is not only perfect for marinating food, but also allows you to buy large portions of meat, which is ultimately cheaper, and then freeze it in portions. My girl and I find this so convenient.


Yes, I know the debate that vacuum sealing may or may not aid in the marination process, I do it for one specific reason. No mess in the fridge. Bottom line, sealed bags don't leak.

With my ribs set up, they go to the fridge, and the night slowly comes to an end.

The next day was a day of outings with George of G.I. Jigsaw. Our first stop was McKay's. I've been many times, but for George, it was his first.

I spent most of my time there digging through the CD's, and while I didn't necessarily find anything from my want list, I did grab a few CD's which intrigued.

Soundtracks
The Jungle Book*Mary Poppins*Snow White and the Seven Dwarfs
2001: A Space Odyssey*Cinderella*Fantasia

80's Soundtracks
Somewhere In Time*Sweet Dreams
Sea of Love*Children of a Lesser God*Bird

80's Albums
Run DMC's Tougher Than Leather*Split Enz' History
Never Repeats (The Best of Split Enz)*Paul Young's Between
Two Fires*Elvis Costell and the Attractions' Blood &
Chocolate*Randy Newman's Land of Dreams*Mike
Oldfield's Discovery

From the CD section, I made my way over to the cartoon DVD's. I found a complete series of the 90's Superman the Animated Series, and felt the price was right for it to come home with me.

Our next stop was Echo Base. I wasn't necessarily looking for anything here, but when I saw a few back issues of What The, and the crossover series Evolutionary War, I decided to grab them.
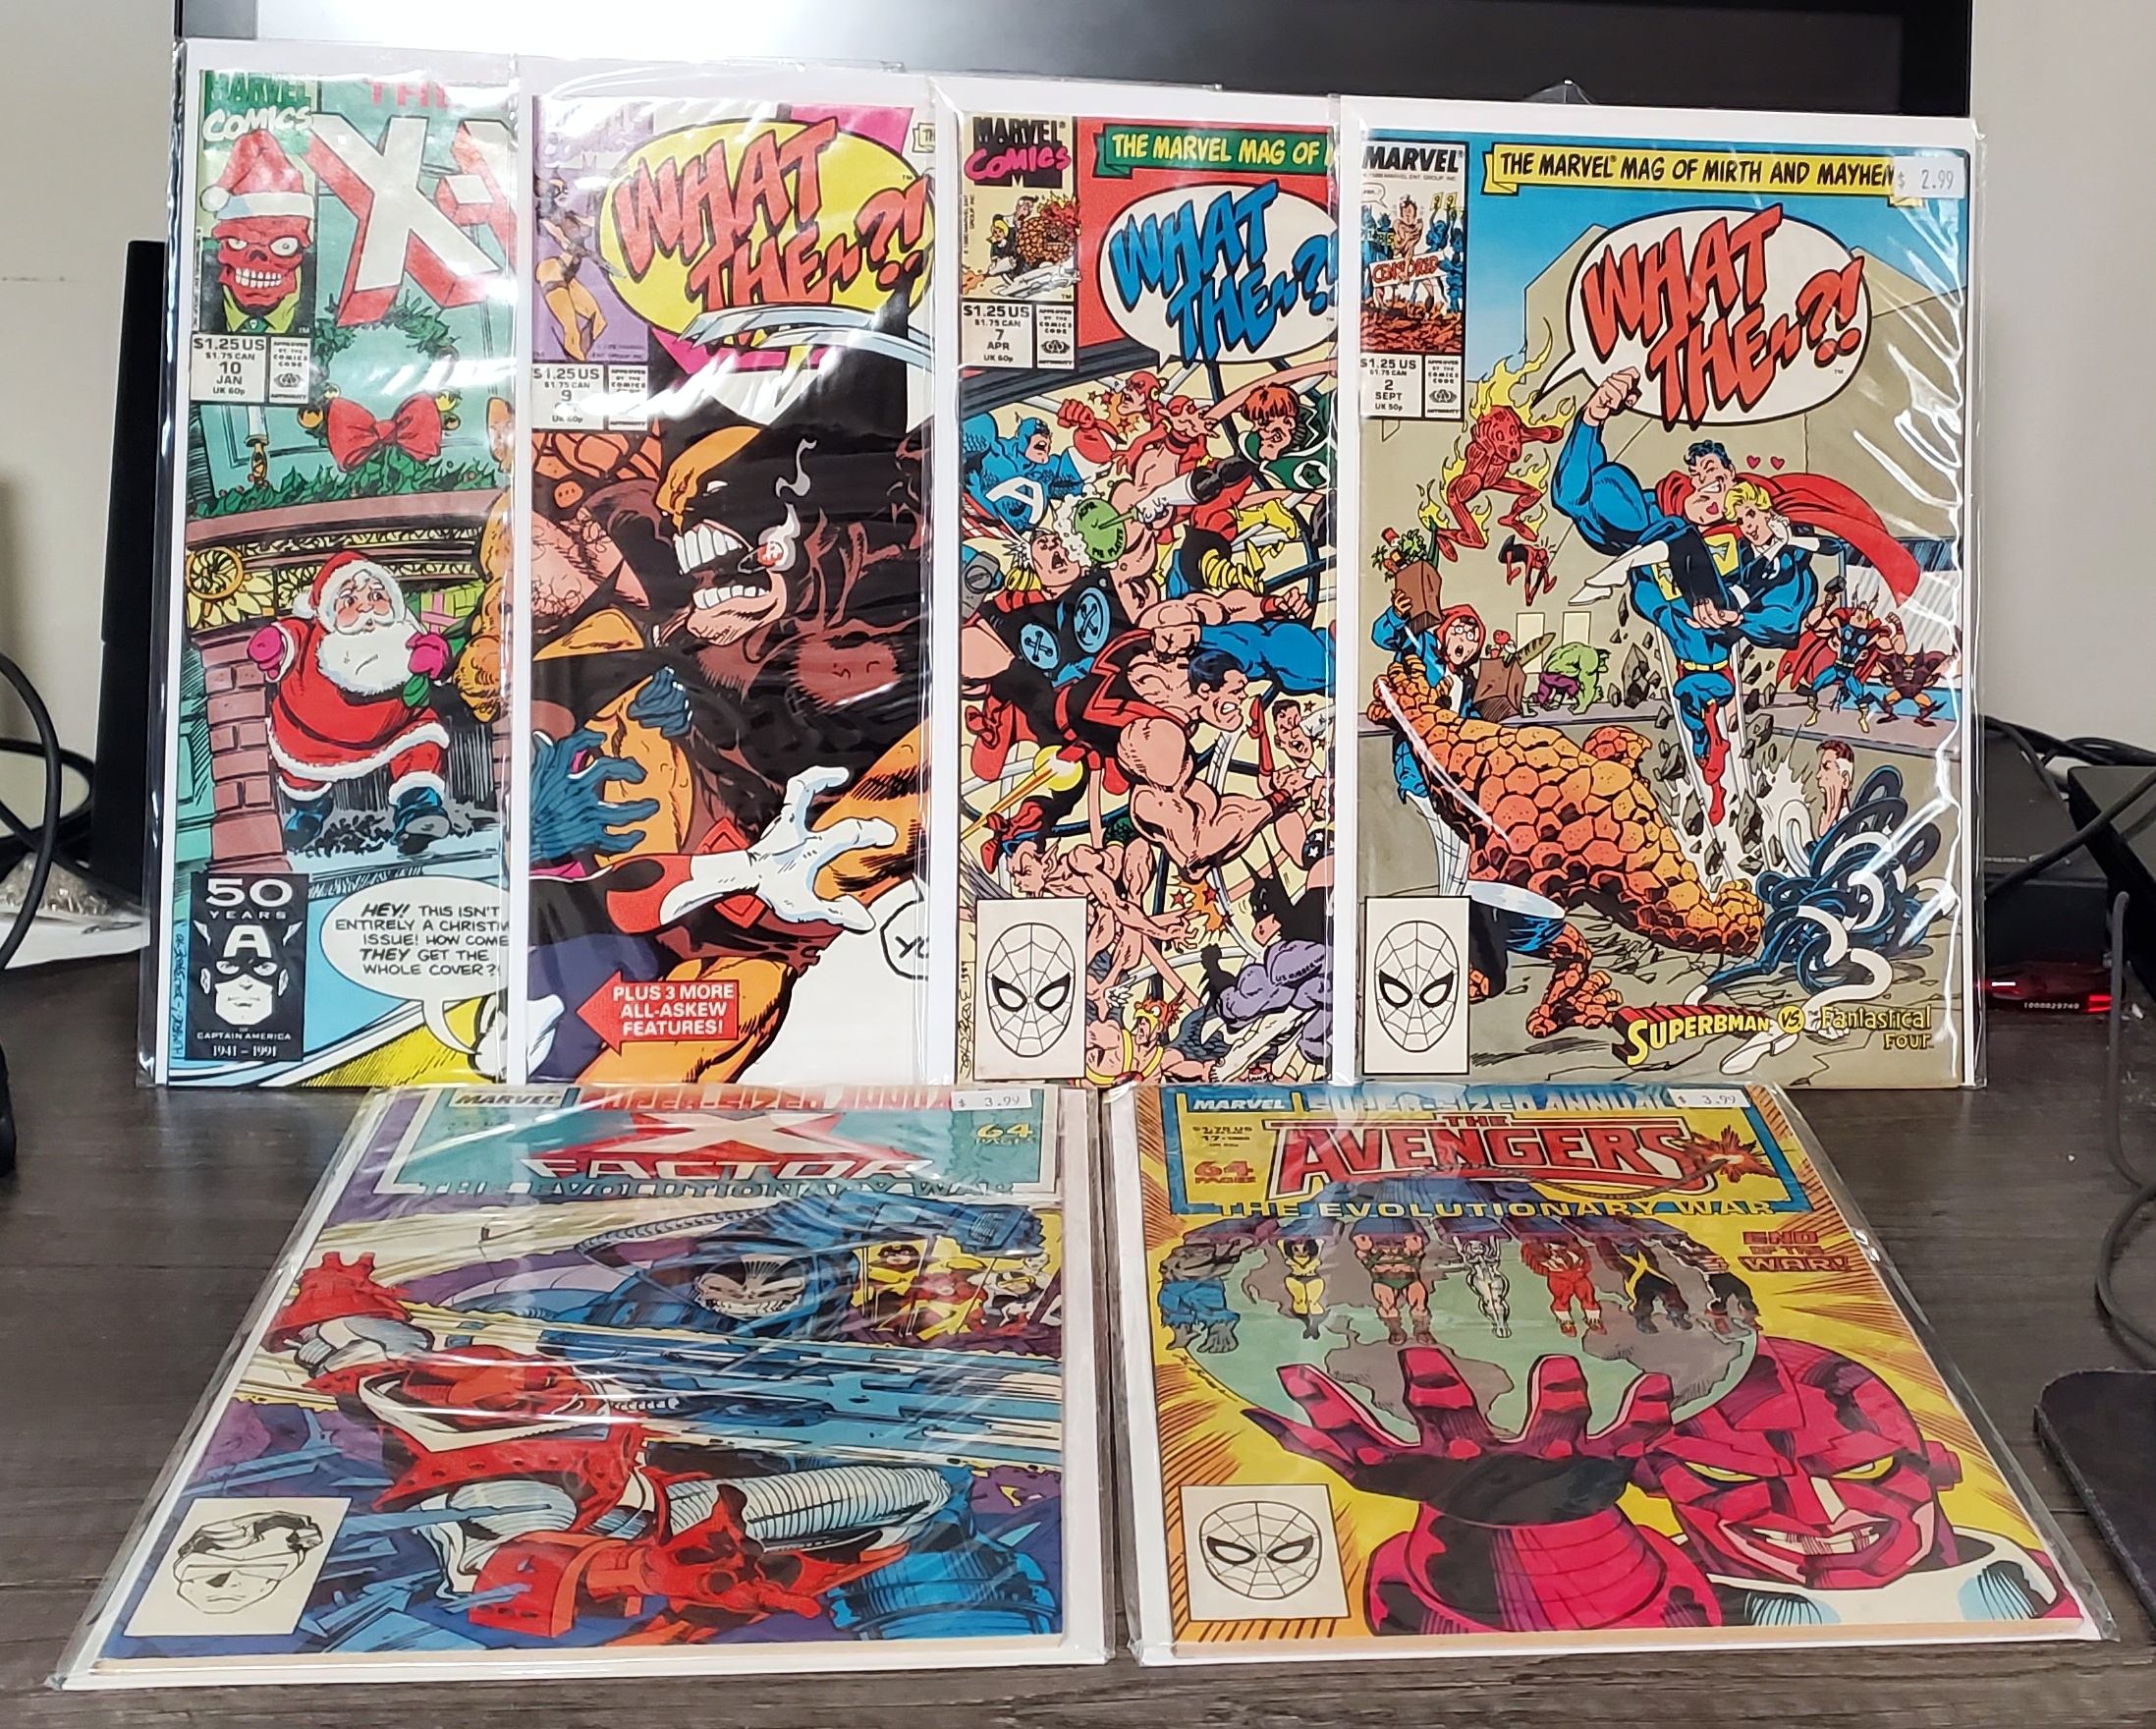
Feeling happy that I wasn't spending a ton of money for the day, I made my way to the exit, only to find George and I in a conversation with the employee there. It was at that moment that I glanced to my left. Big mistake.

Ugh! Mega Man 5 and 6 were the last two games in the series that I didn't own, and while the latter of the sequels has always been "reasonably" priced, 5 has always been rarer and far more expensive. Today was no exception. I paid double what I got all of the above comics and CD's for these two games. My budget for the day was blown, but I wasn't going to leave these two out in the wild.

Our last stop was 2nd and Charles, another store which George hadn't been to. While I glanced around to see if there were any diamonds in the rough, my shopping spree was more than over. As such, I didn't end up picking up anything.

What I did do was ask my girl at noon to open those barbecue ribs up, wrap them in tinfoil, and throw them in the oven on 250°. They'll sit in that low temp for the next five hours, getting all delicious and tender.

After the five hour mark, take those bad boys out of the oven, and carefully open them. There's going to be a bit of liquid in there, so be mindful of steam and spills.

Go ahead and dump that liquid down the drain, being careful to not send your ribs with it. Then give a bone a gentle tug. If it comes out clean, those ribs are right on the money.

Now give those ribs a kiss of sauce. A little, a lot, it doesn't matter. Whatever sauce you like, and as much as you like. Me, I just like a nice thin coat.


Then I use a cooking brush to spread it all over.


Now you have a few choices. These are done, so you can eat them as is. Alternatively, you can throw them back in the oven on a high broil, or even on a grill to get the charred up.

I personally prefer the high broil method for two reasons. One, I'm just looking to get that sauce gooey and sticky. Two, while there's definitely an appeal to charring them on a grill, with how tender they are, you risk losing meat down the slats.

Whatever your method, it's all good. The end result is to get you a good plate full. Eat them off the bone, put them on bread, heck, even dump them on a salad if you're into the healthy lifestyle.

Either way, you know what's up. Dig in and get you some!

Click "HERE" to go back to the home page. For more posts related to this one, please click the labels below.

Homemade Veal Marsala


With the cold days here, it was time for some winter goodness. I'm talking a meal that sticks to your ribs, and warms you from the inside.

Today, I'm making veal Marsala.

Ingredients:

1 to 1 1/2 Pounds Thin Sliced Veal
1 1/2 Cups Marsala Wine
3 Tablespoons Butter
2 Tablespoons Fresh Thyme
8 Ounces Mushrooms (any kind)
1/2 Cup Flour
1/2 Teaspoon Salt
1/2 Teaspoon Pepper
Olive Oil 

How thin should your veal be? You want about twelve slices in a pound and a half. So basically, four slices per half pound. Not a fan of veal? No worries. Substitute thin sliced chicken, or even a nice thick cut filet steak. For chicken, just follow this recipe. For steaks, simply cook to your preference on a grill, and finish it in the sauce.

For my side dishes, I'm making some roasted asparagus and mashed potatoes. So first I'm going to do a bit of prep work, and actually get the sides going, as they're going to take the longest.

In a measuring cup, I have 1/2 a cup of olive oil, two tablespoons of lemon juice, and some salt and pepper (to taste). This is going to be drizzled over my asparagus before it goes into the oven.

I'm also going to pull all my fresh thyme off the stalks, and set that aside.

These are going to go into the oven on 350 for about forty-five minutes. As I put them in, I'm then going to start peeling potatoes, slicing them, and throwing them in a pot of boiling water that has some salt and pepper in it.

I talked about how I make my mashed potatoes in this post, which coincidentally is also a veal dish, and was also accompanied by asparagus.

With asparagus in the oven, and potatoes boiling on the stove, it's time to focus on the main course.

I'm starting by mixing my half a cup of flour with my 1/2 teaspoon of salt, and 1/2 teaspoon of pepper.

Mix this together, and dredge your veal in it to coat both sides. Set this aside, and in a large skillet add just enough olive oil to coat the bottom. You're looking for a shimmer of a coating, but not enough (by any means) to deep fry.

Add your meat, and brown each side a bit over medium heat. Add more oil as necessary, and it will be necessary, especially as you take pieces of meat out and add more to the pan. It will probably take you three to four batches to cook a pound of thin sliced veal.

Because you're not going to clean the pan when done, you need to avoid two thing. Number one is having too much oil. Only add enough to keep that shimmer at the bottom. Number two, keep your heat on medium because things will stick, and that's a good thing, but you don't want it to burn.


Additionally, you're not looking for well done meat. The reason being is that this is going to continue to cook in your sauce, and you want to ensure it stays tender. So look for slightly brown, slightly pink, as shown in the photo above.

When all your meat is "cooked", set it aside on a plate to rest, and remove the pan from heat. This will ensure that all those golden brown bits at the bottom don't burn up on you.

Pre-sliced mushrooms are ideal, but if like me, you go to the store on the one day they don't have them, whole mushrooms are just as fine. All you have to do is give them a good washing, and then slice them up.

Add them to your pan, and return it to low heat. You want these to get a little tender, while maintaining all those golden bits at the bottom, which you're going to gently start to scrape off. Don't worry if they won't cooperate. The wine will de-glaze the pan soon enough. Speaking of which, get this all measured out, and ready to go.


While the preferred wine for Italian Marsala dishes is sweet Marsala, you can easily use a dry variation if that's all you have access to. It will change the flavor slightly.

Add your wine to the pan, and then two tablespoons of fresh thyme. Give this all a good stir, and raise the temperature to medium / high. You want to bring this to a simmer, and let the liquid reduce by 1/3.

Once the liquid has reduced by 1/3, add three tablespoons of butter, and stir this around to melt. Once melted, add your meat back to the pan, and simmer it for five minutes. This is where you want to introduce your steak to the party if you opted to not use veal (or chicken). Just toss it in your sauce though, as you don't want to overcook it beyond your desired temperature.

In the interim of all of this, balance your time with your mashed potatoes, getting them drained, mashed, and ready to go.

Scoop up a pile of potatoes, and make a well in it with the back of the spoon. Fill this well with some of the Marsala sauce, and then place a few pieces of meat and mushrooms on top. Drizzle this with a bit more sauce. Having some delicious rolls on hand to clean up whatever doesn't stick to the potatoes is good eatin' practices. You can sub pasta for the mashed potatoes, but I'm personally not a fan. Noodles don't absorb all that delicious sauce like mashed potatoes do.

Now you know what's up. Get you a fork, and get to digging in!

Even the most harsh food critic will love this one.

Click "HERE" to go back to the home page. For more posts related to this one, please click the labels below.

Homemade Holiday Cinnamon Rolls


Tis the season for warm and delicious baking, and nothing says winter comfort like a good old fashioned homemade cinnamon role!

Sure, you could run down to your local Cinnabon and pick up a six pack, and those would do the trick. However, when you see how easy these are to make, with ingredients you probably already have, and at a fraction of the cost, you may just rethink that going forward. Not only are these cheaper to make at home, but they're more delicious, and you'll get about triple the rolls out of one batch.

Good cinnamon rolls start with a good yeast mixture. For this, you're going to need the following:

2 Cups Lukewarm Water
4 1/2 Teaspoons Active Dry Yeast (or two pouches)
1 Teaspoon Sugar

Measure out your water, and simply add both the yeast and sugar, giving it a gentle stir to incorporate. Then simply leave it alone for about fifteen minutes.

You're look for a frothy mix that jiggles slightly when moved.

Now it's time to prepare the dough, and this is where things will potentially get messy - Literally. Be prepared to clean up flour.

You'll need the following ingredients:

6 Tablespoons of Soft Butter (room temperature)
1 Cup Sugar
2 Cups Hot Water
1 Tablespoon Salt

Put all of these ingredients into a mixer, and turn it on low, utilizing the paddle attachment. You want to end up with this yellowy nasty looking slop shown below.

The next things you're going to need are:

2 Cups Flour
Yeast Mixture
2 Eggs (Beaten)

Add your two cups of flour, and turn the mixer back on the lowest setting, letting it incorporate together. When it is somewhat smooth, add your yeast mixture, and keep mixing on low.

When this is incorporated together, add your two beaten eggs. Let it mix together for a bit, and then turn the mixer off.

Replace your paddle with the dough hook attachment.

For this last step, you're going to need seven to eight cups of flour, which you're going to gradually add, one cup at a time, mixing on low.


The dough will be a sticky paste at first, but just keep adding that flour in, letting it continue to mix. Turn off the mixer, and scrape the sides of the bowl with a rubber spatula as needed, to ensure all that flour gets into the dough.


When done, your dough will still still be a bit sticky, but it should be manageable. Meaning, you should be able to scrape it out of the bowl, and onto a floured surface, without it sticking to and coating everything it touches.

Now you need to kneed your dough, continuing to do so until it turns out satin and smooth like. See the below photo as a sample of when this is done.

Now transfer your dough to a greased bowl, and cover it with a towel. Leave it in a cool / dry place to proof for thirty minutes.


Your dough needs to rest and rise, potentially doubling in size.

Now the mess continues, and for this you're going to need the following:

1 Stick of Butter (soft at room temperature)
1 1/2 Cups Brown Sugar
2 Tablespoons Cinnamon

Mix your cinnamon and brown sugar in a bowl, incorporating the two together. I actually use two bowl, mixing 3/4 cup of brown sugar and one tablespoon together. This way both rolls get the same amount of "filling".

Now take your dough out of the bowl, and place it on a floured surface. Leaving it in its current shape, cut it in half.


Return half the dough to the bowl, and cover it, and using the other half, roll it out into a thin rectangle shape. This is where having a large 24 X 18 rectangular shaped cutting board is beneficial, because you can just roll it out to fit.

Take half your stick of butter, and slice it into five sections, distributing it across the surface of the dough.


Now gently spread it across the dough with a knife, ensuring you butter the entire surface from edge to edge, and corner to corner.


Sprinkle half your brown sugar and cinnamon mixture onto the dough, gently spreading it out with your hand to cover as much of it as you can. Ideally, edge to edge, corner to corner.

Now you need to roll this all up to create that signature cinnamon roll swirl. You want to roll this length wise to get the largest roll up you can.


Try to keep your roll up tight to ensure they stay structurally sound and round when cut. Too loose, and your roll will fold open. Still tasty, but not the best results look wise.


Now, if you were going for the best presented rolls, you would cut the ends of both rolls off to ensure nice swirls on every single roll. But, I'm not, and doing so would be a waste of good cinnamon roll. So instead, I'm just starting my cutting, ensuring each one is two inches thick. You should get about eighteen cinnamon rolls from this recipe.


Looking good, but still not ready to go to the oven.

Instead, what you need to do next is let these have a second proofing. To do so, layer these on a grease tray (or parchment paper), giving about two inches between each one.

Cover the pans with a towel, and let them rest for another thirty minutes. They should expand, possibly double in size.

For me, I'm not looking to bake all sixteen of these today. Instead, I'm making half of them now, and the other half on Christmas day. As such, I'm placing half of these in the freezer, unbaked, where they will be just fine until the day they're needed.

As for the other half, I'm putting these into a greased circular pie pan, ensuring that they are all close together and friendly. This will ensure they don't open when baking.

I pop these into a three hundred fifty degree oven for thirty minutes. As for the frozen ones, if you do this as well, you're going to want to pull them out of the freezer three hours prior to when you want to bake them, and allow them to defrost on a greased pan (or piece of parchment paper) for three hours covered with a cloth. Then simply follow the baking instructions above.

You're looking for a deep golden brown to your rolls. Anything less could result in the centers being raw, and there's really no way to check this prior to pulling them out of the oven and trying to eat them.

Let that cool off for about five minutes to get all that brown sugar to stop bubbling. Then place a large enough plate over the top of it, and turn that bad boy out of the pan.

Now for me, this is perfect. You take the roll, you pull it apart, you dunk it in the coffee, it's good to go! But, some people, they like to take an already sugar laden treat and make it more sugary. By that, I mean they like that white icing on top.

Okay, no problem. It's easy enough to do. Simply let your rolls come to room temperature. While this is happening, in large bowl, mix the following with an electric mixer:

1/4 Cup Butter (soft and at room temperature)
4 Cups Powdered Sugar
4 Tablespoons Milk
1 Teaspoon Vanilla Extract

When it's all whipped up, simply spread it across the tops of your rolls.

These are also very versatile. You don't have to make a traditional cinnamon roll. Instead, you can add any kind of pie filling, Nutella, etc. Whatever you want. You can even add raisins to your cinnamon rolls if you dig them. Either way, make you a batch, and get up in there!

Click "HERE" to go back to the home page. For more posts related to this one, please click the labels below.